


DEMO
Thank you for being here in the last part of this series. Surely if you got this far you are like this:

I'll explain the problem and add any specific comments as needed, This use case are things that I wrote in the past to solve a problem in real apps. 1- Image processing Create a solution to compress an image; move it to the internal folder of the device and show the compressed image.

Solution:
Use a compute/Isolate.run because is a single operation
Pick an image from the UI (MainIsolate) and send the image path to the Isolate
Use a compress algorithm
Move the isolate to the internal folder
Return the new Path to the Main Isolate
From Dart 3.7 you can use background Isolates; this is a subject that I don't cover here but you can check more information here. P1. The operation of obtaining the internal directory of the application is an operation that requires us to use BackgroundIsolates to be able to use plugins that are not written in Dart. If you don't want to use BackgroundIsolates you can send the internal folder as a param. Trigger event:
var rootToken = RootIsolateToken.instance!;
// get the file location
newPath = await Isolate.run(
  () => ImageProcessingIsolate.compressImage(
      FileInfo(
        maxSize: 1 * 1024 * 1024, // <<1MB
        fileLocation: originalPath!,
      ),
      token: rootToken,
    ),
  );
Isolate:
static Future<String?> compressImage(FileInfo info, {RootIsolateToken? token}) async {
    if (token != null) {
      BackgroundIsolateBinaryMessenger.ensureInitialized(token);
    }

    final helper = CompressImageService(info);

    final fileBytes = await _loadBytes(info.fileLocation);
    final newFileBytes = await helper.executeCompression(fileBytes);
    final internalFolder = await _getInternalFolder();

    return MoveFiles.saveInAppSystem(newFileBytes, internalFolder);
}
For isolate to work it is not necessary to know what the compression and file-moving functions do, but you can explore the solutions in the repository.
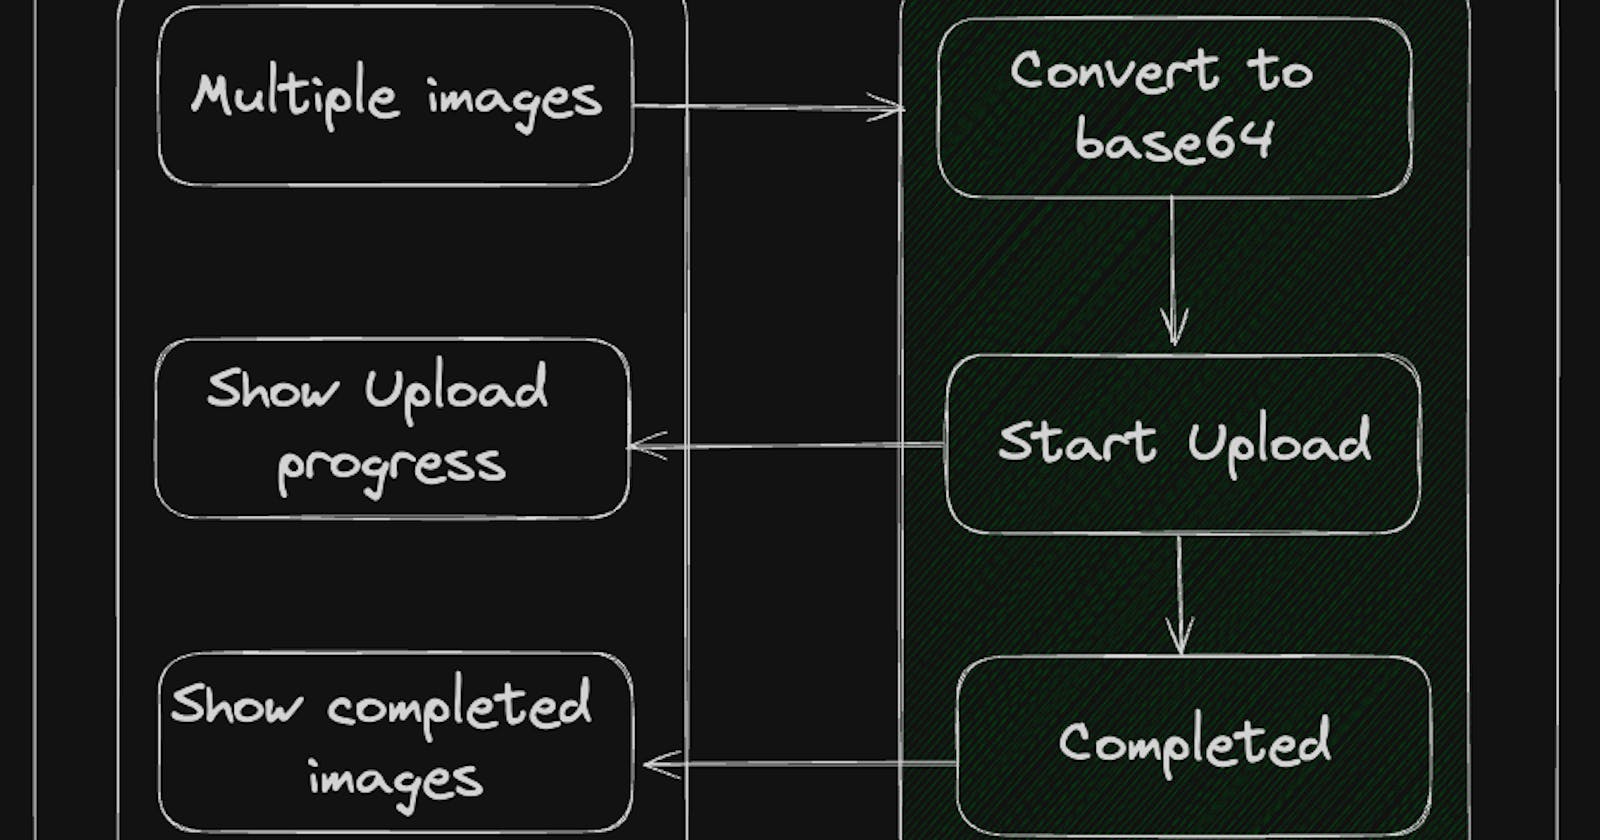
2- Upload images to the server. Upload the images to the server as a String in Base64; you can pick the images and go to another screen; the upload will be kept in the background and all screens need to listen to the updates. Maybe this approach is not the best way, but in one application that I wrote in the past, this was the way provided from the backend.
- Solution:

Use a Spawn Isolate to send images to Isolates
Starts uploading images as you select images
Inform when the upload Start
Inform when the Image completes the Upload
Change the Image state - Uploading/ Completed
Show progress in the UI (How many images are left?)
Use a provider to listen and send messages to the isolate.
The messages for the entrypoint: sealed class IsolateMessage {}
class IsolateMessageData extends IsolateMessage {
  final List<AttachmentInfo> data;

  IsolateMessageData(this.data);
}

class IsolateMessageClose extends IsolateMessage {}
Provider; the provider is used to share the IsolateController instance between different screens.
class UploadImageProvider extends ChangeNotifier {
  final Map<String, AttachmentInfo> _attachments = {};
  IsolateControllerForUpload<IsolateMessage, AttachmentInfo>? _isolateController;
  StreamSubscription? _subscription;

  void init() async {
    _isolateController = await IsolateControllerForUpload.create();
    _subscription = _isolateController?.broadcastRp.listen((attachment) {
      _attachments[attachment.id] = attachment;
      notifyListeners();
    });
  }

  void addAttachments(List<AttachmentInfo> attachments) {
    for (final attachment in attachments) {
      _attachments[attachment.id] = attachment;
    }
    _isolateController?.send(IsolateMessageData(attachments));

    notifyListeners();
  }

  List<AttachmentInfo> get attachments => _attachments.values.toList();

  int get completedCount => _attachments.values.where((element) => element.state == AttachmentInfoState.completed).length;
  int get totalCount => _attachments.length;

  @override
  void dispose() {
    super.dispose();
    _subscription?.cancel();
    _isolateController?.dispose();
  }
}
The only difference between this IsolateControllerForUpload and the controller from the second post is the entrypoint and the In/Out models; other parts remain as in the previous implementation.
Entrypoint When the message has a list of attachments; In this demo, we are going to process them as if they were messages with a single attachment; For that, I am going to use SwitchMap to convert the list of attachments into a list of messages with a single attachment
final messages = rp.takeWhile((element) => element is IsolateMessage)
  .cast<IsolateMessage>()
  .switchMap(
    (message) {
      if (message is IsolateMessageData) {
        return Stream.fromIterable(message.data).map((event) => IsolateMessageData([event]));
      } else {
        return Stream.value(message);
      }
    },
);
final base64Converter = ConvertImageToBase64();
final mockUploadImage = MockUploadImage();

await for (final message in messages) {
  switch (message) {
    case IsolateMessageData _:
      // Early the original list of messages; was converted into multiple messages with a single item per list.
      // This help me to achieve a better control of the state of each item.
      // You can use another approach to achieve the same result.
      final data = message.data.first;
      sendPort.send(data.updateState(AttachmentInfoState.uploading));
      final base64 = await base64Converter.convert(data.fileLocation);

      mockUploadImage.uploadImage(base64).then((value) {
        print('Uploaded');
        sendPort.send(data.updateState(AttachmentInfoState.completed));
      }).catchError((error) {
        sendPort.send(data.updateState(AttachmentInfoState.failed));
      });
      break;
    case IsolateMessageClose _:
      Isolate.exit(sendPort, 'closed');
  }
}
A possible improvement for this code is to set a limit at the same time the uploadImage method is called so as not to overwhelm the server using a queue or a similar solution. Now in the UI, you can use the provider to show on every screen the totalCount and the completedCount
Padding(
    padding: const EdgeInsets.symmetric(vertical: 20),
    child: Row(
      mainAxisAlignment: MainAxisAlignment.center,
      children: [
        Text('Images: ${_provider.totalCount}'),
        const SizedBox(width: 20),
        Text('Completed ${_provider.completedCount}'),
      ],
    ),
  ),
Thank you for reading this far. Consider giving it a like, sharing it, and staying tuned for future articles. Feel free to contact me via LinkedIn.

References
https://medium.com/@kamal.lakhani56/isolate-flutter-74147c1df7ff
https://medium.com/flutter-community/isolates-in-flutter-a0dd7a18b7f6
https://themobilecoder.com/how-to-use-isolates-for-parallel-processing-in-flutter/
https://medium.com/flutter/introducing-background-isolate-channels-7a299609cad8
https://docs.flutter.dev/perf/isolates#using-platform-plugins-in-isolates
https://andrewzuo.com/flutter-isolates-are-good-now-81ec49e1699c
Actor Model: https://en.wikipedia.org/wiki/Actor_model
Actor Model: https://www.youtube.com/watch?v=ELwEdb_pD0k
Actor Model: https://www.youtube.com/watch?v=lPTqcecwkJg
https://medium.com/@gauravswarankar/event-loop-flutter-ea025001ed1b