


In the previous post, we learned the basics of isolates and how to spawn them. In this post, we will learn how to communicate between isolates and some best practices to keep in mind when working with isolates.
Communicate between two isolates
If you read the previous section, you should have a basic understanding of the Actor Model and how isolates work. Now, let's see how to communicate between two isolates using SendPort and ReceivePort.
First of all, let's understand what is a SendPort and a ReceivePort.
ReceivePort: It is a reference to a message queue. You can use it to receive messages from another isolate.
SendPort: You can use it to send messages to another isolate.
A SendPort object is associated with exactly one ReceivePort. But a ReceivePort can have multiple SendPort objects associated with it.
We have two ways to create a ReceivePort; RawReceivePort and ReceivePort. The difference between them is that RawReceivePort is a low-level API and ReceivePort is an API that implements the Stream interface.
If the message object is mutable; Isolate the values to avoid changing the original.
If the object is immutable; Isolate the reference to the object.
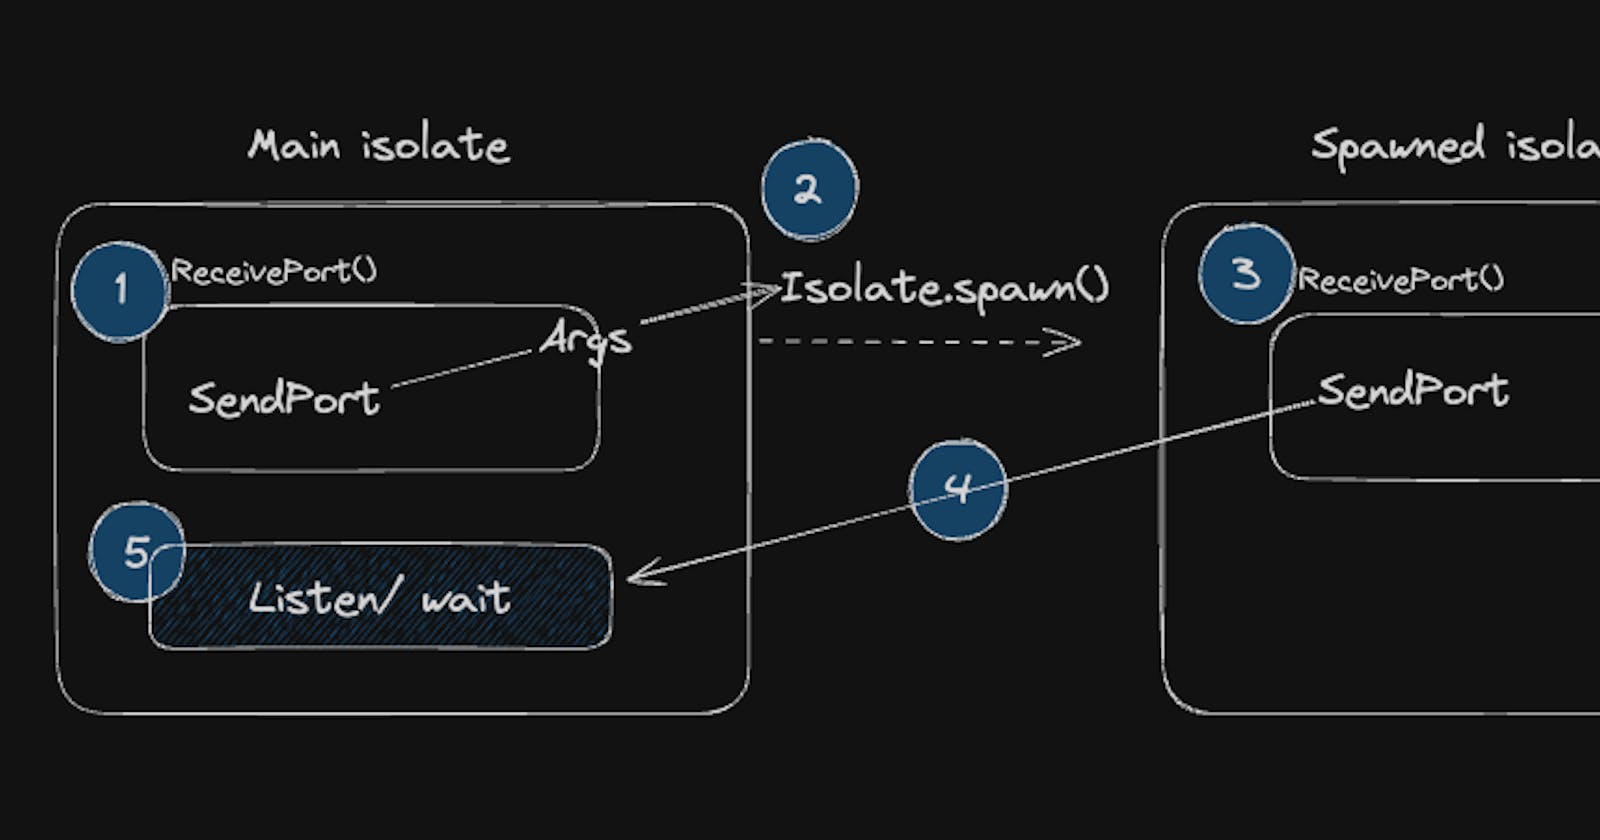
Steps to exchange the SendPort between isolates
Create a ReceivePort before you Spawn the isolate.
Pass the SendPort as an argument to the Spawned isolate. (in the entrypoint of the isolate)
Create a ReceivePort in the Spawned isolate.
Send the SendPort from the Spawned isolate using the SendPort to the Main Isolate.
In the Main Isolate, listen to the ReceivePort or wait for the SendPort.

The Same code as before to explain the steps in Spawn isolates. I'm going to add the entry point
  void spawn() async {
    print('Spawn');
    final rcvPort = ReceivePort(); // --> Step 1

    // --> Step 2
    final isolate = await Isolate.spawn(_doSomethingForSpawn, rcvPort.sendPort);

    final completer = Completer<SendPort>();
    rcvPort.listen((message) {

      // --> Step 5
      if (message is SendPort) completer.complete(message);

      print(message);

      if (message is! SendPort) {
        rcvPort.close();
        isolate.kill();
      }
    });

    final send2Isolate = await completer.future;
    send2Isolate.send(1000000000);
  }
We receive the SendPort from the main isolate as an argument in the entrypoint of the isolate.
  void _doSomethingForSpawn(SendPort sendPort) {
  final rcvPort = ReceivePort(); // --> Step 3
  sendPort.send(rcvPort.sendPort); // --> Step 4

  rcvPort.listen((bigNumber) {
    var sum = 0;
    for (var i = 0; i <= bigNumber; i++) {
      sum += i;
    }

    sendPort.send(sum);
  });
}
In this case, we wait for the SendPort from the SpawnedIsolate; using a completer and the first event in the Isolate listener. Later we are going to exchange this in other ways using the same concept.

Best practices with isolates
The following are some best practices to keep in mind when working with isolates; we will cover these in the next examples.
Error handling: Always handle errors in isolates to prevent crashes.
Kill isolates: Always kill isolates when they're no longer needed.
Limit communication: Avoid sending large objects between isolates.
How to structure?
In the last example, we saw how to exchange the SendPort between isolates, but we can improve the structure of the code. We can explore more in-depth the concept of exchanging the SendPort between isolates.
In order to follow this section; we are using the next example to explain the concept and you need to know about Streams and Futures.

What does this example do?
We send a Random number from the MainIsolate to the SpawnedIsolate.
The SpawnedIsolate converts that number to a String and sends it back to the MainIsolate.
Start with the entrypoint; you can change the await for to listen if you want.
void _entryPoint(SendPort sendPort) async {
  final rp = ReceivePort();
  sendPort.send(rp.sendPort);

  final messages = rp.takeWhile((element) => element is int).cast<int>();

  await for (final message in messages) {
    final r = generateRandomString(message);
    sendPort.send(r);
  }
}
The UI shows the data and the button to send the random number to the SpawnedIsolate.
class BidirectionalExample extends StatefulWidget {
  ...
}

class _BidirectionalExampleState extends State<BidirectionalExample> {
  List<String> encodedData = [];
  int? lastRandomNumber;

  @override
  Widget build(BuildContext context) {
    return Scaffold(
      body: SafeArea(
        child: Column(
          children: [
            TextButton(
              onPressed: () {
              },
              child: const Text('Random number'),
            ),
            const SizedBox(height: 20),
            if (lastRandomNumber != null) Text('Last random number: $lastRandomNumber'),
            const SizedBox(height: 20),
            Expanded(
              child: ListView.builder(
                shrinkWrap: true,
                itemCount: encodedData.length,
                itemBuilder: (context, index) {
                  return Padding(
                    padding: const EdgeInsets.all(8.0),
                    child: Text(encodedData[index]),
                  );
                },
              ),
            ),
          ],
        ),
      ),
    );
  }
}
/// TODO You can find the function to generate the random number and the string in the next file.
Step 1
Create the new variables to handle the isolates and the subscription to the messages.
We need the StreamSubscription to cancel the subscription when the widget is disposed and Completer to wait for the SendPort from the SpawnedIsolate.
Also we keep the Isolate reference to kill the Isolate when the widget is disposed.
  StreamSubscription? subscription;
  final completer = Completer<void>();
  SendPort? send2Isolate;
  Isolate? isolate;
Step 2 Create a function to run in the initState; and Spawn the isolate and create the subscription to receive messages to update the UI
  @override
  void initState() {
    super.initState();
    createIsolate();
  }

  void createIsolate() async {
    final receivePort = ReceivePort();
    isolate = await Isolate.spawn(_entryPoint, receivePort.sendPort);

    final broadcastRp = receivePort.asBroadcastStream();
    send2Isolate = await broadcastRp.first;

    initSubscriptions(broadcastRp);
  }


  void initSubscriptions(ReceivePort receivePort) {
    subscription = receivePort.listen((message) {
      if (message is SendPort) {
        initSendPort(message);
        completer.complete();
      } else if (message is String) {
        encodedData.add(message);
        setState(() {});
      }
    });
  }
Step 3
Create the onPressed function to send the random number to the SpawnedIsolate.
  void sendRandomNumber() async {
    lastRandomNumber = generateRandomNumber();
    setState(() {});
    await completer.future;
    send2Isolate?.send(lastRandomNumber);
  }
The completer indicates when the isolate is ready to receive messages; when is ready we receive the SendPort from the SpawnedIsolate and then we can send the random number.
With this basic structure, we separate the logic to create the isolates and the logic that handles receiving messages.
Optional implementation We want to avoid using a completer. We can use a Stream to listen to the SendPort from the SpawnedIsolate. If you remember ReceiverPort is a Stream and we can use the Stream methods to listen to the SendPort from the SpawnedIsolate.
You need to convert the receivePort to a broadcast stream in order to get the first event that is the SendPort from the SpawnedIsolate. (Check the second line in the entrypoint)
  void createIsolate() async {
    final receivePort = ReceivePort();
    isolate = await Isolate.spawn(_entryPoint, receivePort.sendPort);

    final broadcastRp = receivePort.asBroadcastStream();
    send2Isolate = await broadcastRp.first;

    _sendPortController.add(send2Isolate!);
    initSubscriptions(broadcastRp);
  }

  // Also we can change the initSubscriptions to something like this
  void initSubscriptions(Stream<dynamic> receivePort) {
    subscription = receivePort //
        .takeWhile((element) => element is String)
        .cast<String>()
        .listen((message) {
      encodedData.add(message);
      setState(() {});
    });
  }
What is missing?
Error handling
Kill isolate
We are going to cover these in the next section.
Create a Wrapper/Controller
The main goal is to create something to handle the isolate creation; the messages and the error handling. We are going to use the same example to explain the concept.
class IsolateController<T> {
  final Isolate _isolate;
  final ReceivePort _receivePort;
  final Stream<dynamic> _broadcastRp;
  final SendPort _sendPort;

  static Future<IsolateController<T>?> create<T>();

  Stream<dynamic> get broadcastRp;

  void send(T message);

  void close();

}
Step 1 Use the same code that we have in the previous example to create the isolates.
static Future<IsolateController<T>?> create<T>() async {
  final receivePort = ReceivePort();

  try {
    final isolate = await Isolate.spawn(
      _entryPoint,
      receivePort.sendPort,
      errorsAreFatal: true,
    );

    final broadcastRp = receivePort.asBroadcastStream();
    final send2Isolate = await broadcastRp.first;

    return IsolateController._(
      isolate: isolate,
      receivePort: receivePort,
      broadcastRp: broadcastRp,
      sendPort: send2Isolate,
    );
  } on Object {
    receivePort.close();
    return null;
  }
The main difference is that we are using a try/catch to handle the errors and close the receivePort if something goes wrong.
Step 2
Create other methods to handle the messages and close the isolates.
  Stream<dynamic> get broadcastRp => _broadcastRp;

  void send(T message) {
    _sendPort.send(message);
  }

  void close() {
    _receivePort.close();
    _isolate.kill();
  }
Step 3
How does the UI code change according to the new implementation?
  // New variables
  StreamSubscription? subscription;
  IsolateController<int>? isolateController;

  // Create the Isolate from the initState
  void createIsolate() async {
    isolateController = await IsolateController.create();
    subscription = isolateController?.broadcastRp.listen((message) {
      encodedData.add(message);
      setState(() {});
    });
  }

  @override
  void dispose() {
    isolateController?.close();
    subscription?.cancel();
    super.dispose();
  }
OnPressed function to send the random number to the SpawnedIsolate.
  void sendRandomNumber() async {
    lastRandomNumber = generateRandomNumber();
    setState(() {});

    isolateController?.send(lastRandomNumber!);
  }
How to improve the IsolateController?
In this implementation, we keep the instance of the Isolate to kill it when the widget is disposed. We can implement something to close the Isolate from inside.
We can parametrize the In and Out data types. We can change the In to use Sealed classes to handle the different types of messages that we can send to the SpawnedIsolate.
Create a Wrapper/Controller V2
In this implementation you can see a different way to exchange the SendPort between isolates. If you want to see the full implementation using completer check this branch spawcontroller2-with-completer
This implementation uses Completer to wait for the SendPort from the SpawnedIsolate. What is better; use a Stream or a Completer; it depends on the use case my goal here is to show you the different ways to exchange the SendPort between isolates.
The controller structure
class IsolateController<I, O> {
  final SendPort _commands;
  final ReceivePort _responses;

  final StreamController<O> _controller = StreamController<O>.broadcast();
  late final StreamSubscription<O> _subscription;

  static Future<IsolateController<I, O>?> create<I, O>();

  Stream<O> get broadcastRp;

  void send(I message);

  void dispose();
}
How is the SealedClass and the new implementation of the entrypoint?
// Create many classes to handle the different types of messages that we can send to the SpawnedIsolate.
sealed class IsolateMessage {}

class IsolateMessageData extends IsolateMessage {
  final int data;

  IsolateMessageData(this.data);
}

class IsolateMessageClose extends IsolateMessage {}


void _entryPoint(SendPort sendPort) async {
  ...// same as before
  await for (final message in messages) {
    switch (message) {
      case IsolateMessageData _:
        ...
        break;
      case IsolateMessageClose _:
        ...
    }
  }
}
In this case to exchange the SendPort; use a completer to get from the first message in the ReceivePort; and use RawReceivePort this class doesn't implement the Stream interface.
  static Future<IsolateController<I, O>?> create<I, O>() async {
    final initPort = RawReceivePort();
    final connection = Completer<SendPort>.sync();

    /// Use a callback to get the SendPort from the SpawnedIsolate
    /// The SendPort is the first message in the ReceivePort
    initPort.handler = (initialMessage) {
      connection.complete(initialMessage as SendPort);
    };

    try {
      await Isolate.spawn(
        _entryPoint,
        initPort.sendPort,
        errorsAreFatal: true,
      );

      /// Wait to the completer
      final SendPort sendPort = await connection.future;

      return IsolateController._(ReceivePort.fromRawReceivePort(initPort), sendPort);
    } catch (e) {
      initPort.close();
      print(e);
      return null;
    }
  }
With this implementation how do we close the Isolate from inside? Send a IsolateMessageClose close the Isolate.
  void dispose() {
    _commands.send(IsolateMessageClose());
    _subscription.cancel();
    _responses.close();
  }
In the entryPort close the Isolate when we receive the IsolateMessageClose. Use one of these two options.
Isolate.exit(); // This method allows to send a last message to the MainIsolate
rp.close();
  void _entryPoint(SendPort sendPort) async {
    ...

    await for (final message in messages) {
      switch (message) {
        ...
        case IsolateMessageClose _:
          Isolate.exit(sendPort, 'Closed'); // or rp.close();
          break;
      }
    }
  }
Update the UI:
Call the dispose isolate method in the dispose method of the widget.
The send method needs to send an IsolateMessageData to the SpawnedIsolate.
  void sendRandomNumber() async {
    ...
    isolateController?.send(IsolateMessageData(lastRandomNumber!));
  }

  @override
  void dispose() {
    isolateController?.dispose();
    subscription?.cancel();
    super.dispose();
  }
Conclusion
Using controller v1 or v2 will depend on how you wait to develop; in the v2 to kill the Isolate; the Isolate needs to receive a message to close.
Use Stream or Completer depending on what is easier for you in terms the complexity.
Take in mind this is a basic structure; you can add more complexity according to your necessities.
DEMO

The truth of Demo use cases is I'll explain the problem and add any specific comments as needed, but you can access to demo code directly from the GitHub repository.
The code is inside the demo folder;
1- Image processing

Use a compute/Isolate.run because is a single operation
Pick an image from the UI (MainIsolate) and send the image path to the Isolate
Use a compress algorithm
Move the isolate to the internal folder
Return the new Path to the Main Isolate
1- Upload images to the server.

Use a Spawn Isolate to send images to Isolates
Starts uploading images as you select images
Inform when the Upload Start
Inform when the Image completes the Upload
Change the Image state - Uploading/ Completed
Show progress in the UI (How many images are left?)