


The post will provide a comprehensive exploration of Dart isolates, covering fundamental concepts and advanced techniques. It will delve into the basics of isolates, their role in concurrency, and how they relate to futures and streams. The discussion will extend to advanced topics, such as message passing, isolates communication, and optimizing performance also I'll show two practical demos.
This post is the first part of two; in this part, we are going to see the theory in deep to understand Isolates.
The second part introduces a way to create an Isolate Wrapper/Controller and shows the three demos around Isolates.
What are isolates?
An Isolate in Dart enables concurrent processing, allowing multiple tasks to run simultaneously. It operates as a "thread" with its event loop and separate memory space(it's a thread wrapper).
One of the differences with threads is Isolates don't share memory and communicate with each other through messages using the Actor Model (We'll visit this later).
In Flutter, they're used to perform intensive tasks in a separate space other than the main one, preventing delays in the user interface.
Isolates enable Dart code execution separate from the main UI.
They facilitate concurrent operations without blocking the UI.
Isolates operate as distinct Dart VM instances enabling parallelism processing.
Each isolate has its own memory space, state, and event loop.
Why do we need them?
Before we get into this, we first need to understand how async-await and the event handling.
Event Loop
Dart is single-threaded, which means it can only execute one task at a time. This is where the event loop comes in. The event loop is a queue of tasks that are executed in order.
Imagine you're in a busy coffee-shop where a barista handles orders efficiently. The barista represents Flutter's event loop, constantly processing orders (events) from customers (user interactions). Just like the barista ensures everyone gets served promptly, Flutter's event loop keeps the app responsive to user actions and updates.
Async-Await
Async doesn't mean parallel, it means non-blocking. When you call an async function, it returns a Future immediately. The function continues to execute, and when it's done, it completes the Future. This is the basis of the event loop, which is a queue of tasks that are executed in order.
Suppose you have an I/O operation to read a JSON file, the event loop will work like this:
1- We receive the request to read the file. 2- The event loop will add the task to the queue. 3- The event loop will continue to process other tasks. 4- When the file is read, the event loop will execute the callback.

More information about this can be found in the Dart Futures - Flutter in Focus.
Event handling
Isolate encapsulates a wrapper around thread; each isolate ha with its event loop managing queued events. Events, representing user interactions, are processed by the event loop in a FIFO manner. This ensures the timely execution of app actions.

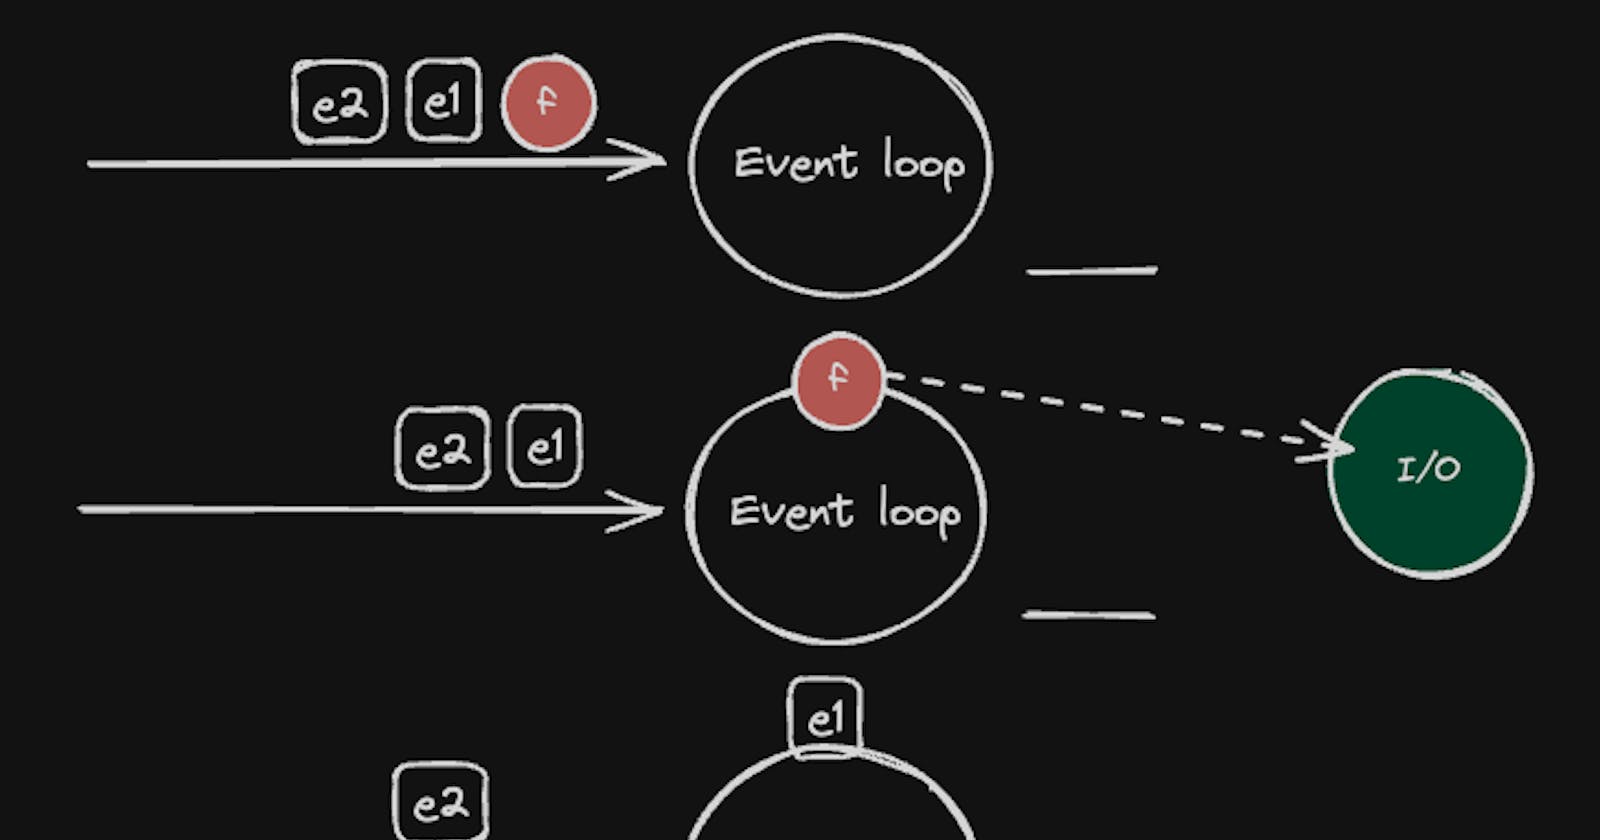
For a moment let's imagine that we have to do an I/O operation like reading a JSON; that this file is very large and the task takes a long time to complete. Now the event queue and the event loop look similar to the image below.

Since the main isolate struggles to promptly process events, our animations or UI may freeze, frustrating users and causing significant drop-offs. Here's where creating a new isolate or a worker isolate becomes crucial.

Let’s get back to Isolates.; why do we need them?
Concurrency: Execute Dart code simultaneously, without affecting the main thread.
Isolation: Each isolate has its memory, avoiding data issues.
Parallelism: Run code on multiple CPU cores for better performance.
Communication: Isolates exchange messages to share information.
Background Processing: Run time-consuming tasks in the background without UI impact.
Heavy task: Like image processing or data fetching.
How to implement Isolates?
Basically, there are two ways to create an isolate:
Compute Isolate (This use Isolate.run)
Spawn Isolate (This use Isolate.spawn)
As we mentioned before, Isolates unlike threads, don't share memory, and communicate with each other through messages using the Actor Model. This means that you can't share data between isolates, you need to send messages to communicate between them.
The entry point of an isolate is a function and must be a top-level or static function. Depending on the method you use to create an isolate, you can pass arguments to the function.
Here is the link to the code if you want to follow along.
Image you need to calculate a progressive sum of a number.
void doSomething(var bigNumber) {
  final timer = Stopwatch()..start();
  print('Doing something');

  var sum = 0;
  for (var i = 0; i <= bigNumber; i++) {
    sum += i;
  }
  print('finished ${sum}');
  print('InitializeAppData Completed in ${timer.elapsedMilliseconds} ms');
  timer.stop();
}
If you try to execute this function without using an isolate, you will notice that the UI will freeze for a few seconds. This is because the main isolate is busy calculating the sum, and it can't process any other events.
Compute Isolate
The compute or Isolate.run function creates an isolate and runs the specified function in it. This is useful for short-lived tasks that don't require continuous communication between isolates.
You can use compute or Isolate.run to execute the function in a separate isolate. Both methods return a Future that completes with the result of the function.
  void computeIsolate() {
    print('Compute');
    compute(doSomething, 1000000000);
  }

  void runIsolate() {
    print('Run');
    Isolate.run(() => doSomething(1000000000));
  }
Spawn Isolate
The spawn function creates an isolate and runs the specified function in it. This is useful for long-lived tasks that require continuous communication between isolates.
  void spawn() async {
    print('Spawn');
    final rcvPort = ReceivePort();

    final isolate = await Isolate.spawn(_doSomethingForSpawn, rcvPort.sendPort);

    final completer = Completer<SendPort>();
    rcvPort.listen((message) {
      if (message is SendPort) completer.complete(message);

      print(message);

      if (message is! SendPort) {
        rcvPort.close();
        isolate.kill();
      }
    });

    final send2Isolate = await completer.future;
    send2Isolate.send(1000000000);
  }
In the next image, you can see the difference between the do the execution in main isolate and use an isolate.

// TODO The code of this specific example is here link; inside the learning 1 folder.
I'll return later to explain the steps of the spawn function also we need to cover what is a SendPort and a ReceivePort, and how to use them to communicate between isolates; before that, I want to give you a brief explanation of the Actor Model.
Actor Model
If you want to understand in more detail what the paradigm is that drives how isolates work?, this section is a summary of it; As a personal appreciation, this helped me understand how to create good architecture around the Isolates; but you are free to skip to the next session.
Concurrency models
Processes
Threads
Futures
Coroutines
Actor
etc
What is the Actor Model?
The actor model is a concurrent programming that is based on the concept of actors. An actor is an entity that encapsulates state and behavior, communicates with other actors by sending and receiving messages, and processes messages sequentially.
Key concepts:
Actors are persistent.
Encapsulate internal state (Private).
Actors are asynchronous.
Communication through messages.
Independence between actors.
Supervision.
What can actors do?
Create new actors.
Send messages to other actors.
Receive messages and in-responses.
Process exactly one message at a time.
“Do not communicate by sharing memory; instead, share memory by communicating" | Effective Go
Properties of communication
NO channels or intermediaries.
“best effort” delivery.
Messages can take an arbitrarily long time to deliver.
No message ordering guarantees.
Address
Each actor has an address.
Actors can communicate with other actors using their addresses (Use SendPort to send messages).
The actor receives addresses from other actors in messages (Listen ReceivePort).
One actor can have more than one address.
Address != identify; this means two actors with the same identity can have different addresses.
Supervision The running state of an actor is monitored and managed by another
Constantly monitors the running state of the actor (is alive, restart)
Can perform actions based on the state of the actor (eg unhandled error)

Isolates similarities
ReceiverPort is a similar concept to Actor Mailbox.
The Mailbox is a message queue.
SendPort is a similar address concept in the actor.
This is the basic concept of the Actor Model, and it's the base of how isolates work. With this in mind, we can understand how to use SendPort and ReceivePort to communicate between isolates.
Here is a summary of the difference between Isolates and Threads that are provided by the Actor Model.
Isolation of memory: Isolates don’t share memory and the data is passed through messages.
Lightweight: You can create thousands of isolates.
Safe concurrency: Isolates provide a safe way to perform concurrent operations, minimizing the risk of common concurrency issues like deadlocks.
Communicate between two isolates
If you read the previous section, you should have a basic understanding of the Actor Model and how isolates work. Now, let's see how to communicate between two isolates using SendPort and ReceivePort.
First of all, let's understand what is a SendPort and a ReceivePort.
ReceivePort: It is a reference to a message queue. You can use it to receive messages from another isolate. SendPort: You can use it to send messages to another isolate.
A SendPort object is associated with exactly one ReceivePort. But a ReceivePort can have multiple SendPort objects associated with it.
We have two ways to create a ReceivePort; RawReceivePort and ReceivePort. The difference between them is that RawReceivePort is a low-level API and ReceivePort is a high-level API that this implements the Stream interface.
If the messages object is mutable; Isolates the values to avoid change the original.
If the object is immutable; Isolates the reference to the object.
Steps to exchange the SendPort between isolates
Create a ReceivePort before you Spawn the isolate.
Pass the SendPort as argument to the Spawned isolate. (in the entrypoint of the isolate)
Create a ReceivePort in the Spawned isolate.
Send the SendPort from the Spawned isolate using the SendPort to the Main Isolate.
In the Main Isolate, listen to the ReceivePort or wait for the SendPort.

Same code as before to explain the steps in Spawn isolates. I'm going to add the entry point
  void spawn() async {
    print('Spawn');
    final rcvPort = ReceivePort(); // --> Step 1

    // --> Step 2
    final isolate = await Isolate.spawn(_doSomethingForSpawn, rcvPort.sendPort);

    final completer = Completer<SendPort>();
    rcvPort.listen((message) {

      // --> Step 5
      if (message is SendPort) completer.complete(message);

      print(message);

      if (message is! SendPort) {
        rcvPort.close();
        isolate.kill();
      }
    });

    final send2Isolate = await completer.future;
    send2Isolate.send(1000000000);
  }
We receive the SendPort from the main isolate as argument in the entrypoint of the isolate.
  void _doSomethingForSpawn(SendPort sendPort) {
  final rcvPort = ReceivePort(); // --> Step 3
  sendPort.send(rcvPort.sendPort); // --> Step 4

  rcvPort.listen((bigNumber) {
    var sum = 0;
    for (var i = 0; i <= bigNumber; i++) {
      sum += i;
    }

    sendPort.send(sum);
  });
}
In this case we wait for the SendPort from the SpawnedIsolate; using a completer and the first event in the Isolate listener. Later we are going to exchange this in other ways using the same concept.

Best practices with isolates
Error handling: Always handle errors in isolates to prevent crashes.
Kill isolates: Always kill isolates when they're no longer needed.
Limit communication: Avoid sending large objects between isolates.
See you in the next part where we will apply concepts from the Actor model to create a Wrapper/Controller for our Isolates
Thank you for reading this far. Consider giving it a like, sharing it, and staying tuned for future articles. Feel free to contact me via LinkedIn.

References
https://medium.com/@kamal.lakhani56/isolate-flutter-74147c1df7ff
https://medium.com/flutter-community/isolates-in-flutter-a0dd7a18b7f6
https://themobilecoder.com/how-to-use-isolates-for-parallel-processing-in-flutter/
https://medium.com/flutter/introducing-background-isolate-channels-7a299609cad8
https://docs.flutter.dev/perf/isolates#using-platform-plugins-in-isolates
https://andrewzuo.com/flutter-isolates-are-good-now-81ec49e1699c
Actor Model: https://en.wikipedia.org/wiki/Actor_model
Actor Model: https://www.youtube.com/watch?v=ELwEdb_pD0k
Actor Model: https://www.youtube.com/watch?v=lPTqcecwkJg
https://medium.com/@gauravswarankar/event-loop-flutter-ea025001ed1b